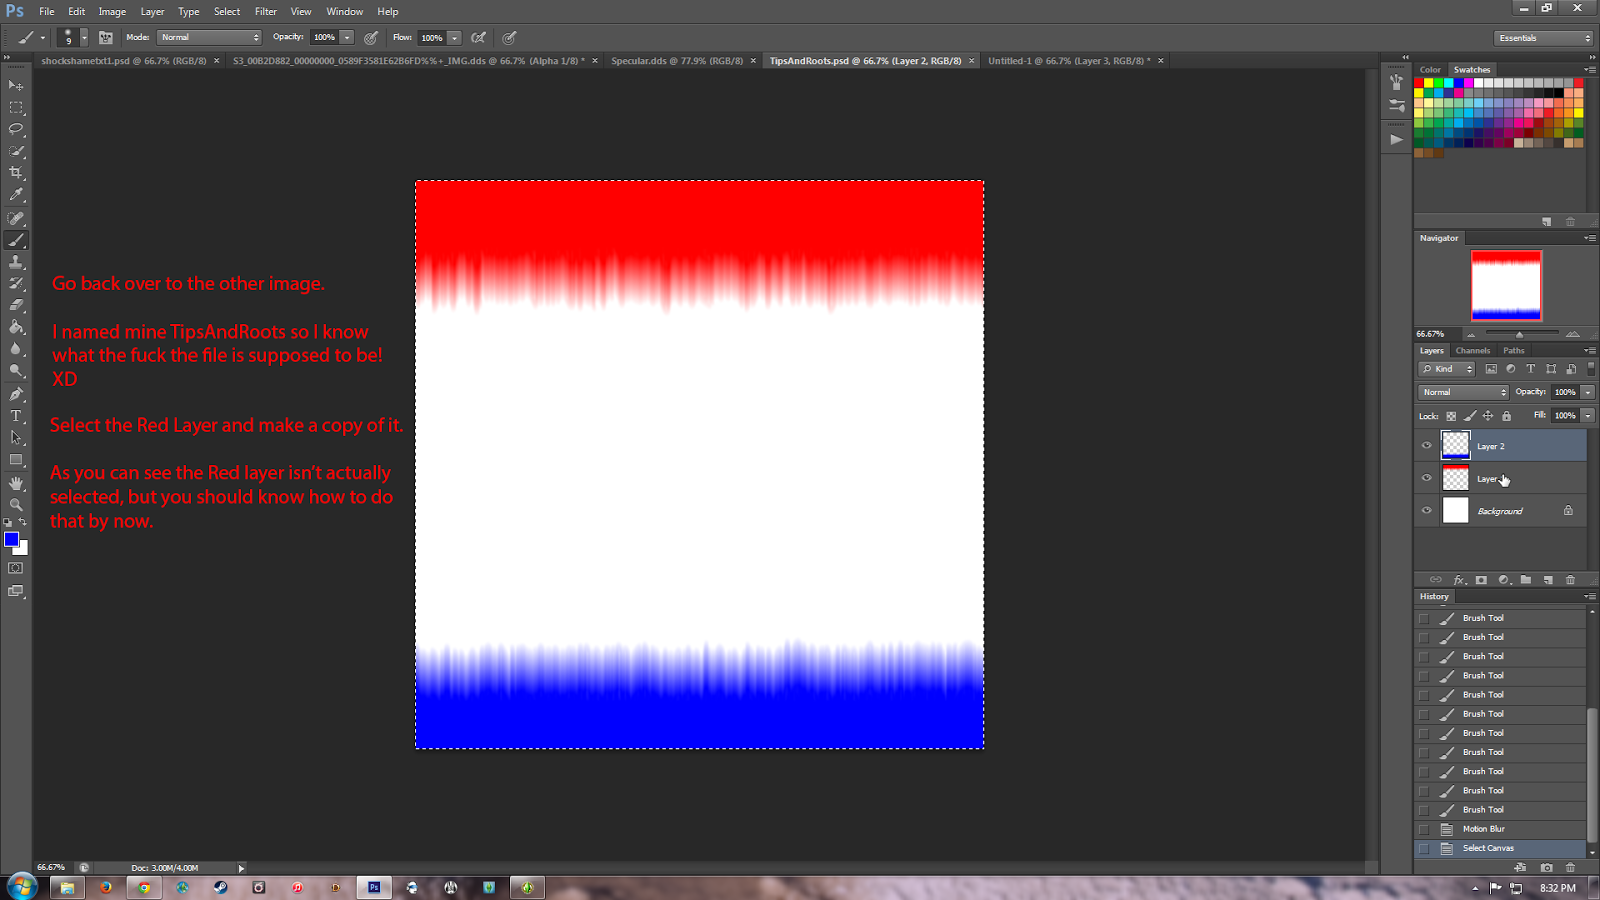
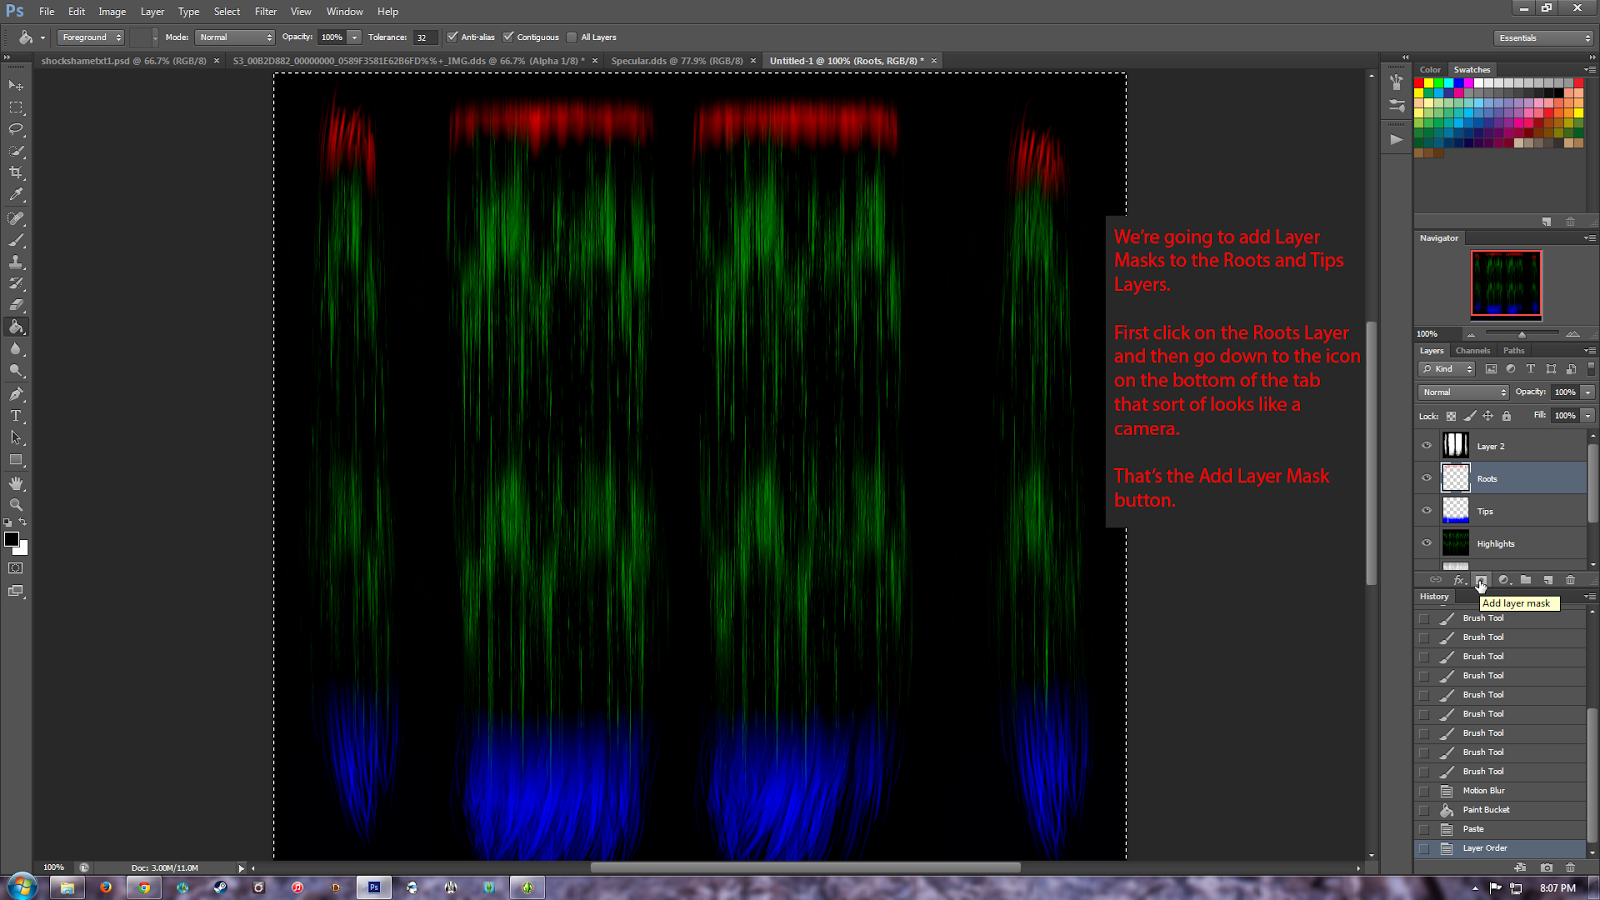
In this section we're going to learn how to do the Control. The control determines where on the Hair the game adds color. So when you adjust the Roots, Base, Highlights, and Tips of the Hair, the control is actually what tells the game where those colors go. In this part of the tutorial, I'll show you how to make an Adjust Shine Control as well as a EA Highlight Control. The control is the most time consuming and the hardest, but I'll try to make the steps as clear as possible.
Okay head on over to your Diffuse texture again, and make a copy of the whole thing. (Ctrl+A then Ctrl+C)
Make a new Image again. (File > New), and then Paste the Diffuse Texture into it. (Ctrl+V)
Now go back to the Diffuse texture and make only the Alpha channel visible. (To do this click on the Channels Tab, make the Alpha Channel visible by clicking on the Gray box to the left of the Alpha's thumbnail, and then make the RGB channels invisible by clicking on the eye next to the RGB thumbnail.) Make a copy of the Alpha channel (Ctrl+A then Ctrl+C)
Paste it into your new image. You should now have 3 layers, the background, your diffuse's texture, and your diffuses's alpha channel.
Now we're going to use the Alpha Channel as a guide of sorts. It'll let us know where to paint in the colors. To do this we need to change the Blending Mode for this layer.
To change the blending mode go up to the box above the layers that says "Normal" when you click on it you'll see that it makes a drop down menu appear. We're going to change the blending mode from Normal to Multiply. This will make the layer below visible through the white areas of this layer.
Next we're going to make three new layers. First make sure you have Layer 1 selected.
Then, to make a new layer click on the icon that looks like a piece of paper with it's corner folded back. The icon will be at the bottom of the layers panel.
Now we'll name the layers. You can either name them when you make them, or rename them afterward. I completely forgot to name them while I was creating them, so to rename them after the fact just double click on the layer's name and type in what you want the layer to be called.
I'm going to name my layers: Roots, Highlights, and Tips.
Now we're going to paint the root areas red, but before we start painting I'm going to have you take a look at the original control first. This is important because we need to know which areas need to be painted Red and Blue, because it's not always the Top and Bottom of the texture. Sometimes what you think should be the "Roots" of the hair, and should therefore be painted red, doesn't actually need to be painted at all.
Open up Cazy's hair in s3pe and look at the control. You'll notice that this one is very straight forward. The top of the texture is red, the bottom is blue. Cazy uses red throughout their control, but we won't be doing this, so ours is going to look a bit different than theirs. The important part to remember when you're looking at the control is that the color Red is at the top and the color Blue is at the bottom. The color Green is used for the Highlights and if you take a look at Cazy's Diffuse texture, you'll notice that the area where Green is painted on the Control actually matches up where the Shine is on the Diffuse texture. Okay, back to the actual painting.

First make sure your Roots Layer is selected then select the Paintbrush Tool from the vertical tool bar on the left. Now go up to the Tool Options Bar which is located underneath the Main Menu Bar. This is where you change the preset options for your current tool. On the far left there is a small window with a fuzzy blob and then a number underneath. This is where we select which type of paintbrush we want to use. click on the little arrow to access the drop down menu, like indicated in the picture.
We're going to want a "fuzzy" or "soft" brush. Really all this means is we want the default brush with the hardness set all the way to 0%. I generally use a 9 pixel brush for this. Use whichever you want, but you don't want the brush to be too big because the outcome will look strange. Also, choose too small of a brush and you'll be painting all day long. XD
It's easier for me to see what I'm doing here if I zoom in first. To zoom in you can either press Z on your keyboard and then click to zoom, or you can use the Navigator Tab. I prefer the Navigator Tab which is why I added it to my workspace.
To use the Navigator Tab to zoom you can either press the Big and Small Mountains to zoom in and out by increments or you can use the arrow and slide it yourself.
Choose the color Red from the Swatches Panel. The Red on the top left is True RBG Red, which is what we want.
Making sure that your Roots layer is selected, paint all across the top where the texture is showing. You want it to be jagged and messy like you see in the picture.
(Side Note: If you paint a large area of your control red, in game you'll have a bigger area where the Roots color will show up on the Hair, if that makes sense. The same applies to the Tips as well)
After you've colored in red all along the top, you'll notice that it looks a tad strange. Don't worry, we'll fix that in this next step.
We're going to use a Filter on our layer to make our red drawn in mess look more blended. So go ahead and Select Filter from the top menu and then select Blur > Motion Blur. This filter will blur our red colored mess, but only in a certain direction.
Set the angle to 90 degrees, because we want to blur our layer in the same direction that the Diffuse Texture is goes. I use my eye for the Distance, in this case I have mine set to 54 pixels. After you've applied the Motion Blur to the layer, you'll notice that it doesn't look as drawn on. We'll make it blend in with the texture even more in a bit.
I like the Tips to cover a larger area of the texture, than I do for the Roots. So first select the Rectangle Marquee Tool from the Tool Bar on the left.
Make sure to have your Tips Layer selected.
Next I draw a big ass rectangle around the bottom hair pieces.
Then select the color RGB Blue from the swatches panel. Then select the Paintbucket Tool.
"But, wtf there is no paint bucket tool on the bar!?" Well, yes there is, it's just currently hidden. (It seriously took me way too long to figure this out on my own) Take your cursor and mouse over the Gradient Tool, then Hold your left mouse button down until and window appears. From this window choose the Paint Bucket Tool. Congratulations, the Paint Bucket Tool is now active. You can also do this with most of the other tools as well. If a certain tool has another tool "hidden behind it", there will be a tiny arrow beneath and to the right of the tool.
Now that you have your Paintbucket Tool selected click in the rectangle to make just that area completely blue.
Now I don't really like how much of the texture is covered in blue on some of these hair pieces. The two in the middle have too much blue covering the texture for my taste, so I'm going to move those two areas down a bit. To do this we'll need to deselect the area we already have selected. You can do that by left clicking anywhere on the image. (For the "click to remove" method to work, you must already have the rectangle marquee tool selected. You can deselect when you have another tool selected by pressing Ctrl+D) Now make a rectangle around the blue area covering the two middle pieces.
Once you've done that choose the Move tool from the Tools Panel. It's the one at the top.
Move your cursor somewhere into the rectangle and left click and drag down. You'll notice that this moves your selection down as well. Okay, that looks fine to me.
Now select your paint brush and start drawing jagged lines along the edge of the blue, just like you did with the red.
If you make a mistake, like I did here, don't sweat it because you can easily undo what you just did.
This is where the History Tab comes in handy. Notice it has the actions I've preformed in order? Well we can undo one, or a whole bunch, of actions by clicking on whichever "step" you'd like to revert to. In this case I click on the previous step and then redo my painting so it doesn't look wonky.
Once you're done go ahead and use the Motion Blur Filter again.
Again, we want to blur our layer at a 90 degree angle, but this time I want to make the Distance bigger. I change it to 111, because that's where it looks good to me. Play around with it and find something you like. On to the highlights next. Choose whichever Highlights you'd like to do and then continue the tutorial.
Click Here for Adjust Shine Highlights
So I'll admit that before I made this tutorial, I had never done EA Highlights for my control before because I like adjust shine, and there really isn't a tutorial out there for making your own EA type Highlights. I played around a little and I came up with 2 methods that I tested out in game and I liked them both so you'll have to decide for yourself which one you use.
Make a new image and then head over to your Specular Image and make a copy of it. Then paste that copy into your new image.
Next Bring up the Levels window by pressing Ctrl+L, mess with the levels until it looks similar to the picture. We want the contrast between the white and black to be really prominent.
Method 1:
The first method I tried looked like this in game.
We're going to use Motion Blur on the Image first. So bring the Motion Blur window (Filter > Blur > Motion Blur). We'll blur it at a 90 degree angle and at a distance of around 500 pixels.
Now bring up Levels (Image > Adjustments > Levels) or Ctrl+L. Play around with the Levels until you're satisfied with the result. Keep in mind that these lines will end up being your highlight lines in game.
Once you're done make a copy of it and go back to the rest of the tutorial. (This is the image you'll be making a copy of and pasting into the Green Channel for the next step.)
Method 2:
This is what the second method looked like in game. Choose the one that you like the most.
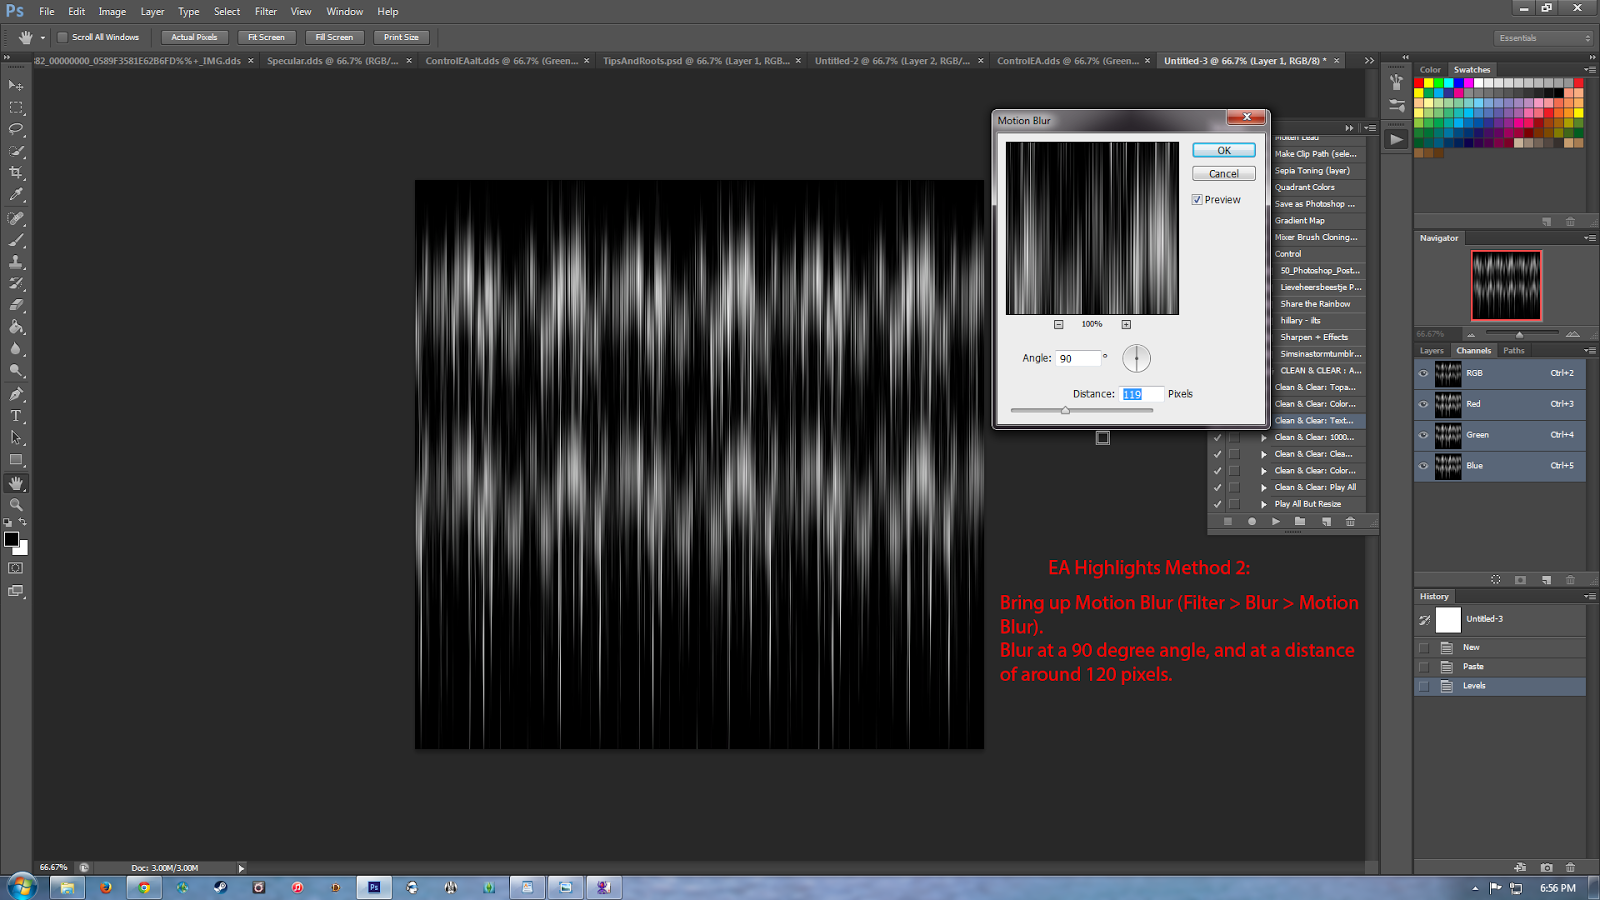 We're going to use Motion Blur with this method as well, but this time we're only going to blur it by about 120 pixels or so.
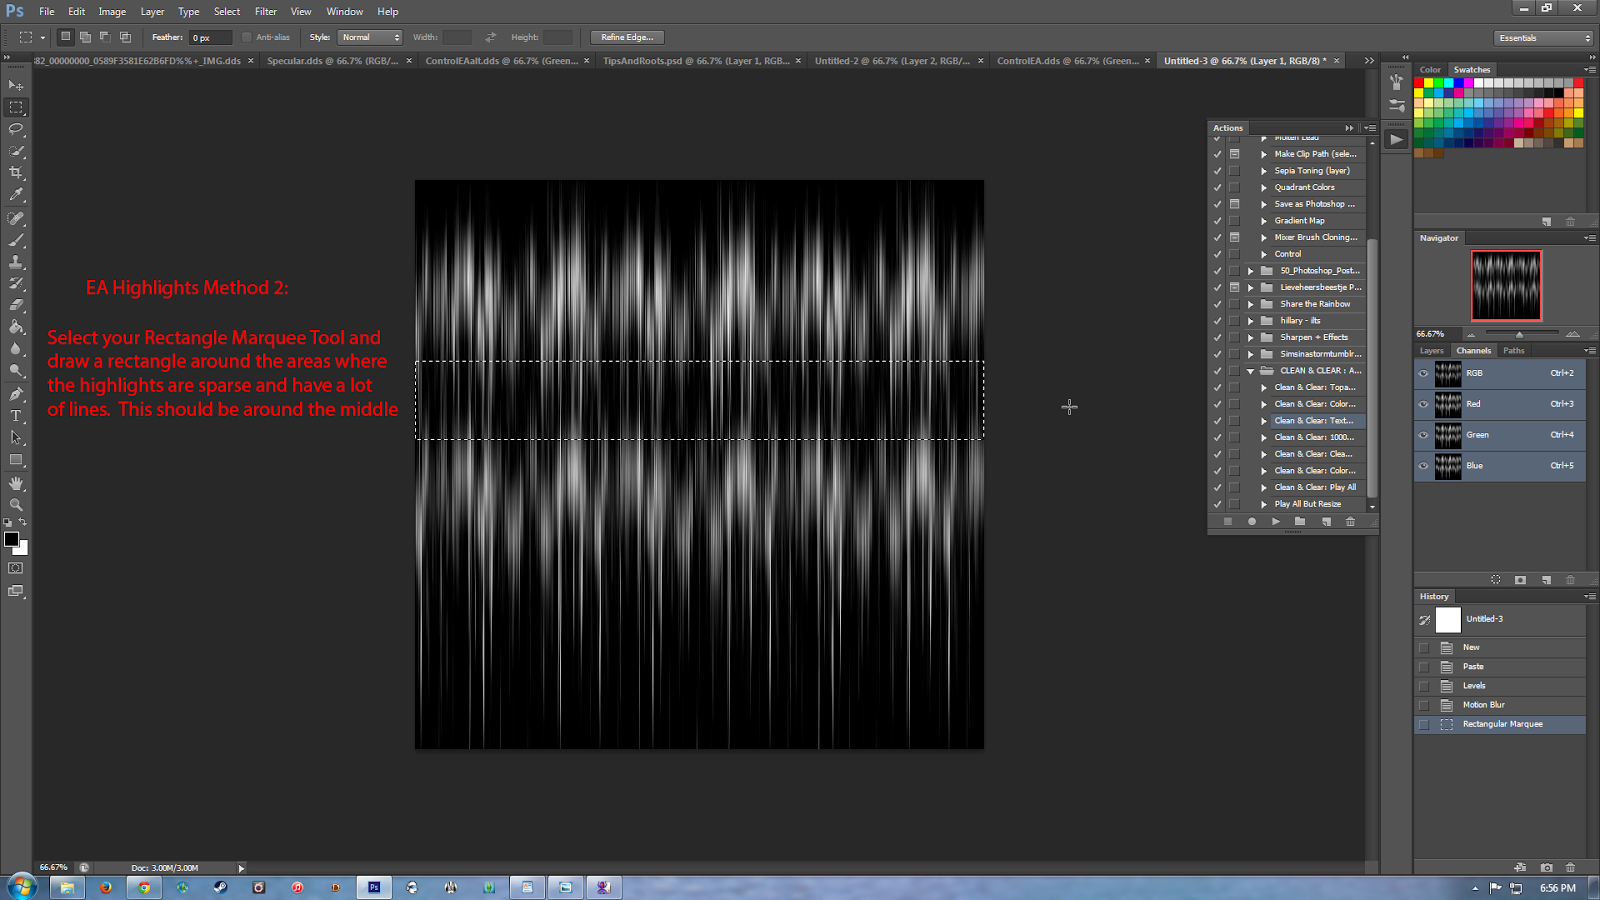
Select the Rectangle Marquee Tool and draw a rectangle around the middle. We want to select the areas where the "shine" is the least prevalent. I know technically it's least concentrated at the bottom, but for this technique, using the bottom won't produce very good results.

Next select the Move tool and then check "Show Transform Controls" from the Tool Options Bar.
After you've done that, put your cursor at the top of the rectangle until it turns into a double arrow.
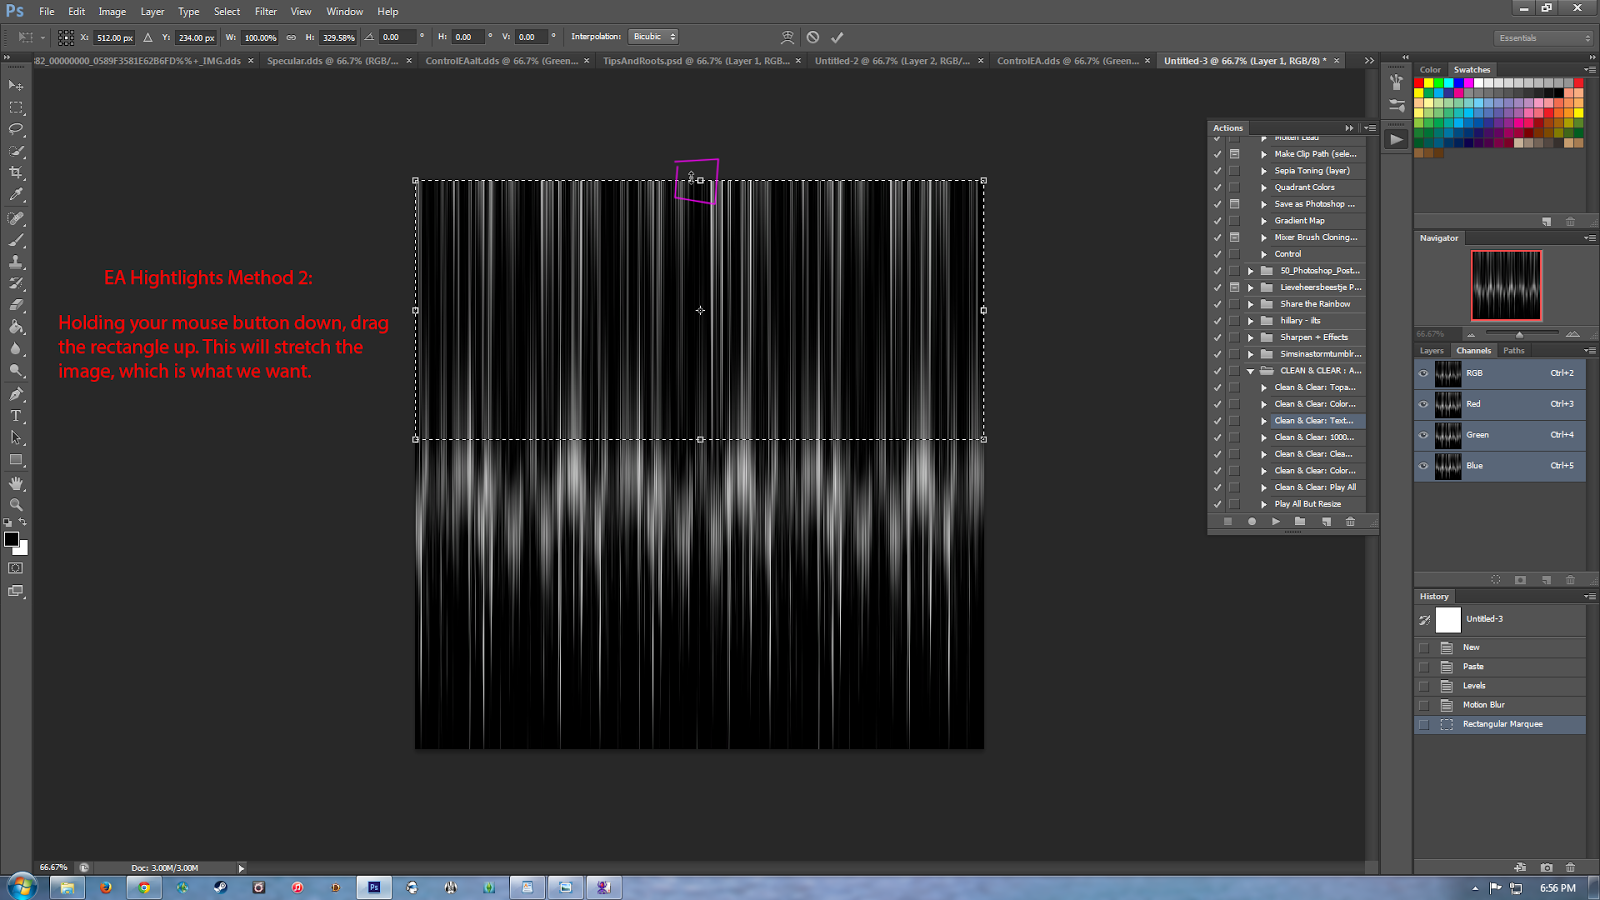
With the mouse button held down drag the rectangle up, stretching the image out in the process. Let go when the rectangle gets to the top of the image
Now pull the bottom of the rectangle all the way down to the bottom of the image, stretching the image out even more.
Bring up the Levels window (Ctrl+L) and play around with the levels until it looks good, keeping in mid that this is the base for what your highlights will look like in game. Once you're done make a copy and go back to the rest of the tutorial.
(This is the image you'll be making a copy of and pasting into the green channel for the next step)
Navigate over to your specular and make a copy of it. We will be using the Specular as our Highlights.
Yes, it's as easy as that >.>
Continue the Tutorial Here:
Go back to your Control and select the Highlights Layer.
Change your color to black, you can do this by choosing black from swatches or by clicking on the Background/Foreground icon that is above the Background/Foreground Thumnail. If you click on it you'll notice the thumnail turn from Blue/White to Black/White. This means your current Foreground color is Black.
Now that you've selected Black as your active color go ahead choose the Paintbucket Tool again.
Now with your Highlights Layer selected, left click anywhere on the image and it will fill that layer completely in black.
Now click on the Channels Tab and Select the Green Channel. Make sure the other two channels are deselected.
Paste the copy of the Image you just made into the Green Channel. (For Adjust Shine this will be the specular, for EA Highlights this will be the image you made with either Method 1 or Method 2.)
You'll notice that pasting your highlights into the Green Channel has made our Tips Layer invisible, This is because the Tips Layer is below the Highlights Layer. We don't want that so we're going to move the Tips Layer above the Highlights Layer.
Select the Tips layer and then hold down your left mouse button and drag the layer up so that it's in between the Roots and Highlights layers.
Now our Tips are visible again. You'll notice, though, that the Roots and Tips layers still kind of look like blurry messes. We'll go ahead and fix that now with a Layer Mask.
The layer mask kind of acts like an alpha that's only for that particular layer instead of the entire image. If you paint black onto your layer while you have the layer mask selected that part of your layer will become invisible.
So with your Roots layer selected make a layer mask. To do this click on the little icon that looks like a Camera at the bottom of the panel.
This will make a white little box appear to the right of the Roots Layer's Thumnail.
Do the same thing with the Tips Layer. Remember make sure to have the layer you want selected first, before you add a layer mask. Otherwise, you'll add a layer mask to a whichever layer you happen to have selected.
We're going to paste our Diffuse texture into our Layer Mask, this will make the Roots and Tips Layers conform more to the original texture and hence not look like a blurry mess. In order to paste something into a layer mask you'll need to first make sure it's selected. You do this by clicking on it's thumbnail. When you click on the thumbnail a box will appear around it, letting you know that it is currently selected.
Now go back over to your Diffuse texture and make a copy of it, then come back over to your control.
You'll also need to make sure your layer mask is visible.
To do that you'll need to go back into the Channels tab and click the box next to the white thumnail to make it visible. The eye icon should appear in the box's place.
Now use Ctrl+V to paste your copied texture into the layer mask. When you're done go back to the Layers Tab. Don't make your Layer mask invisible again quite yet!
Now click on the Roots Layer Mask Thumbnail and press Ctrl+V again to paste the Diffuse into that layer mask as well.
When the Diffuse is pasted into both layer masks, you can go back to the Channels Tab and make the mask invisible again.
Go back to your Layers Tab. You'll notice that the Roots and Tips layers look less like a blurry mess, but they also look a tad faded.
To fix this first click on the Roots layer mask thumbnail and invert the mask.
To invert it, just go ahead and press Ctrl+I or go to Image > Adjustments > Invert.
Now we're going to use Levels to bring out the Red again. So press Ctrl+L or go to Image > Adjustments > Levels. Move the left and right arrows around until it looks good to you.
We're not going to invert the Blue, we're just going to use Levels on it. So make sure you click on the Tips Layer Mask and then press Ctrl+L again. Again move the Left and Right arrows around until you're happy with the result.
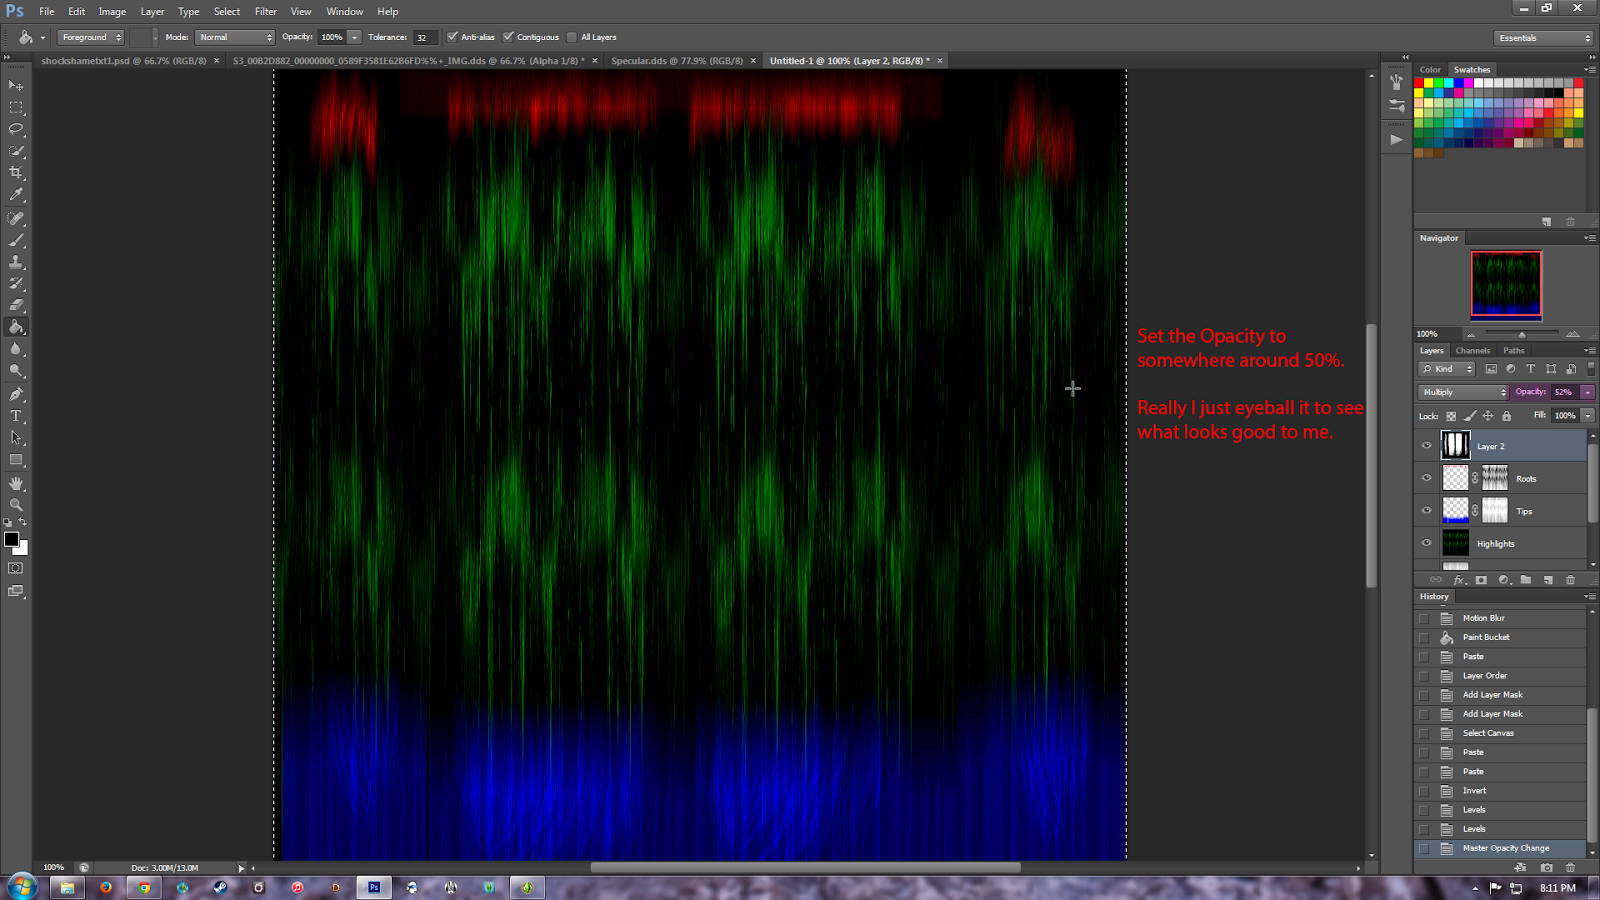
Now go up to the top layer, which is the Alpha that we pasted in earlier. We're going to change the Opacity of this layer so that it doesn't interfere with the other layers as much.
To change the opacity make sure you first have the layer selected then click on the drop down arrow to the right of where it says Opacity at the top of the Panel.
Change it so that it's less than 50%.
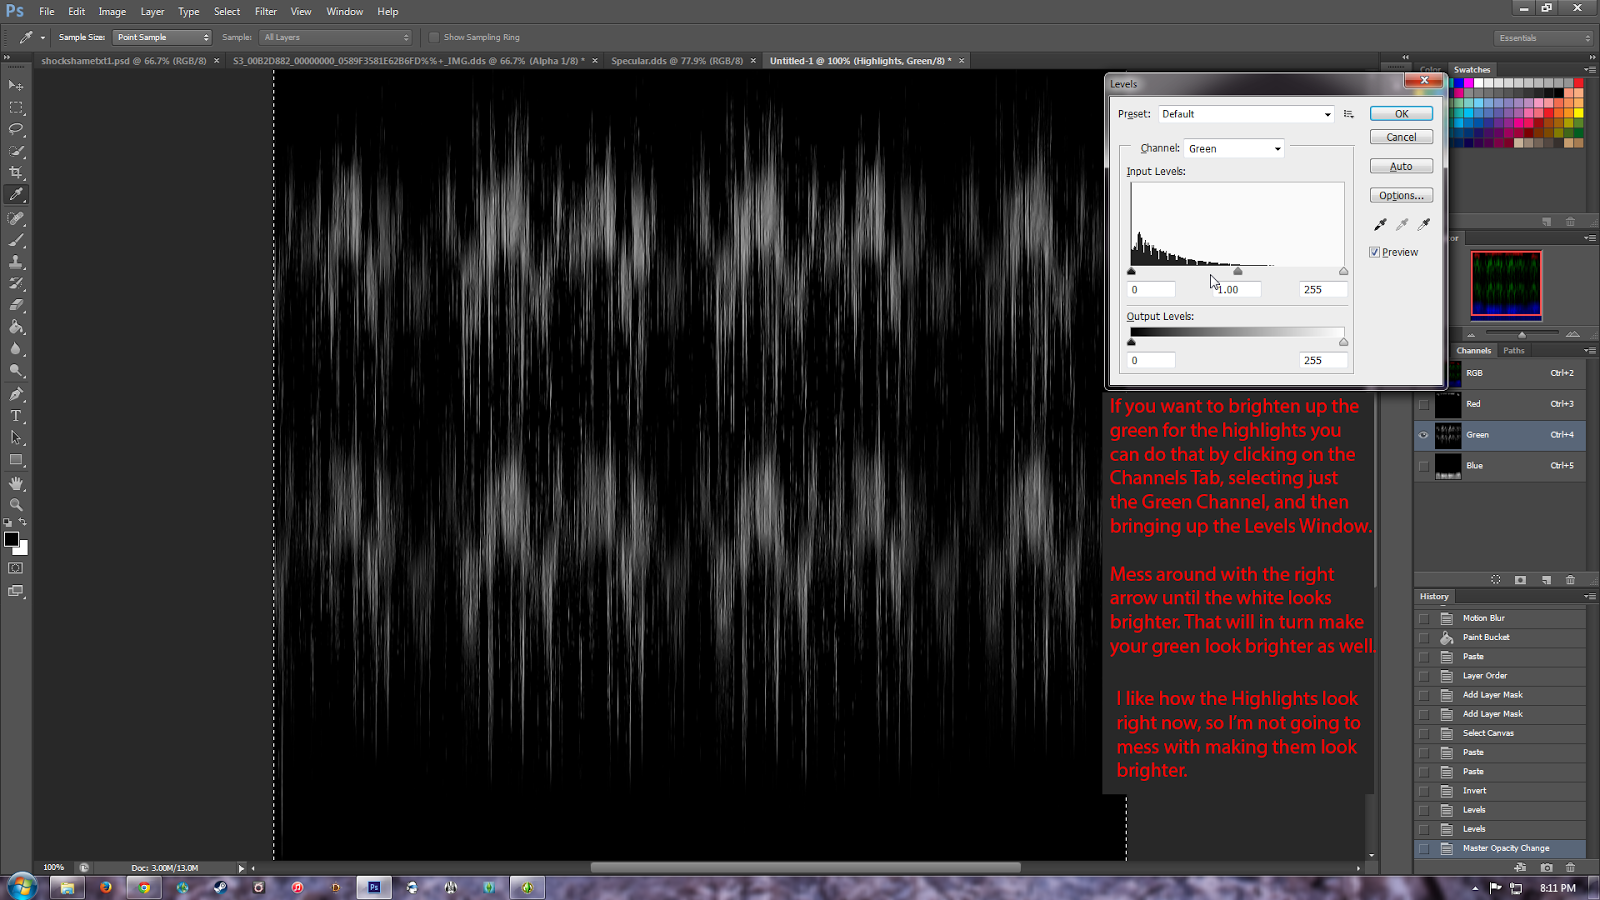 At this point if you want to brighten up the highlights, you can do that by going to the Channels Tab. Select the Green Channel and then bring up Levels to make the highlights brighter.
Go ahead and Flatten your Image by pressing Ctrl+F or by going to Layer > Flatten Image. You are now done!