Naiya's Color Your Plumbbob Tutorial
First off you'll need to download and install s3pe. I used the Window's Installer version and followed the instructions from the installer.
There should be an option to associate .package files with s3pe, you'll definitely want to do this.
Once you've installed s3pe navigate to where your Sims 3 game is installed and then find the Gameplay folder. For me the path looks as follows:
Once there you should find the GameplayData.package file:

Right click on this file and choose copy. (This is extremely important. You DO NOT want to edit this file directly because it could screw up your game. ALWAYS edit the copied file)

Paste it into your projects folder. I always make a new folder for each of my projects just to keep it organized. It's a lot easier to find things that way.
Once you've pasted it into your project folder go ahead and open it in s3pe. Now when you first open s3pe you'll want to make sure "Names" and "Tags" are checked at the bottom and that your preview is set to "Value". After you've done so, it should look like this:

Great! Now we can find the resource we want. Go ahead and type the word "mood" into the name box. Then click the box directly to the left of it. Click Set and then click the "Filter Active" box

Perfect! Now the file we're looking for is the _XML file called MoodManager. Right click on this file and choose the export>to package option.

It will now prompt you to name your package. Choose where you want to export your new package to. I chose my project folder. Choose a descriptive name so you know what the package does, if you plan on sharing it with others make sure you include your user name or initials so that the person downloading it knows how made it. I named mine NF_PinkPlumBobs. (Apparently I don't know how to spell plumbob as I found out later when trying to search the xml file for the word XD) Click Open and it will save your new package file

Okay now we can close out the GameplayData.package file. Once that's closed out open up the package file you just made. This is going to be the one that we actually edit. Now right click on the _XML resource and choose Notepad all the way at the bottom.

Your screen should now look like this, with the xml file open in notepad and a whole bunch of crazy looking text and values.

Don't panic! It looks intimidating, but it's really very easy. Okay now to find the line of text that we need. Use Ctrl+F to bring up the find box and type in the word plumbbob. (see I told you I spelled it wrong, apparently it has 3 b's and not 2)

Click Find Next to find the line of text we're looking for. We're looking for this line in particular
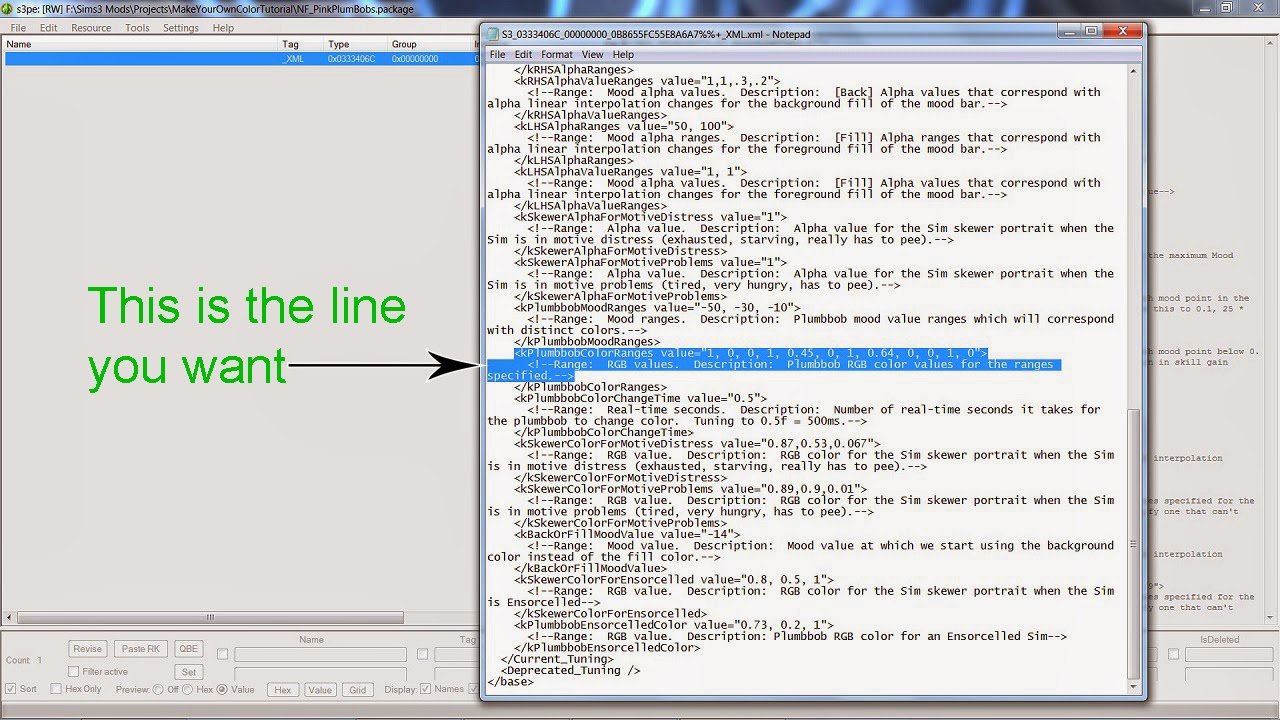
So in this line of text you'll see a bunch of numbers. These numbers are actually RGB values in disguise. The game takes a normal RGB value and condenses it by two decimal values. In other words a value of 100 would now become 1. A value of 65 would become .65 and so on.
So, how the heck do we know which values correspond with what color? Well to answer this question I'm going to have you open the vanilla version of paint you got with Windows. (Those of you familiar with photoshop can also do this within photoshop, obviously)
When you open Paint it should look like this
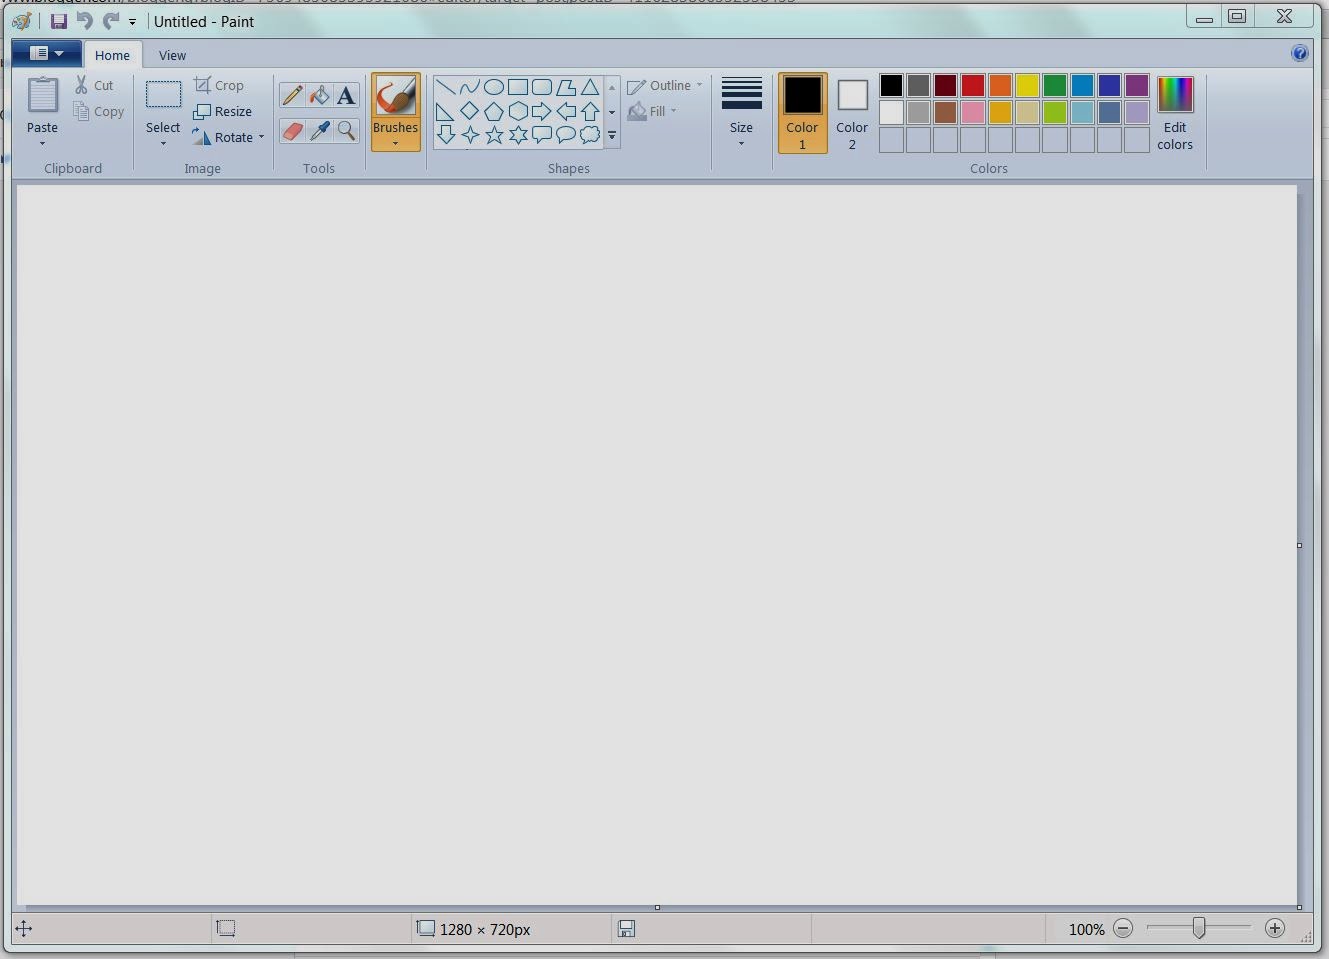
Now click on the Edit Colors button up at the top. This will bring up the color Palette. In the bottom right hand corner of this window, you'll see Red, Green, and Blue (RGB) and then some numbers next to each color. These numbers are important because they are the numbers you'll be entering to determine what color your plumbbob is.

Now let's click on Red. You'll notice that the numbers change to (R=255, G=0, B=0) this is pure red. Black is when all value's are 0, like they were when you first opened the palette. White is when all values are 255. Try clicking on other colors, you'll notice the numbers change. Basically any color you can think of will have an RGB value assigned to it.

Now back to notepad. If you look at the values in the line of text that we'll be editing you'll notice that there are 12 numbers and that none of those numbers are over 1. There are two reasons for this. The first is the game takes the RGB values and moves the decimal over 2 spots. 100 becomes 1, 45 becomes .45, 64 becomes .64, and so on. I'm not sure why they chose to make the game only read values of 1 and lower for the plumbbob color, but that's what they did. The game will not read any values you put in that are over 1.
But what if I want my color to be white, you ask? Well technically white's RGB code is 255,255,255 which will convert to 2.5, 2.5, 2.5, putting the values over the number 1! I'll get to that later, for now Look at those twelve numbers. Now we know that RGB codes are a sequence of 3 numbers and there are 12 numbers right? That means that there are 4 different colors that our plumbbob can turn. From playing the game we know those colors are Red, Orange, Yellow, and Green. These are the RGB codes that correspond to those colors:

Now to change those values. For this you'll want to open Paint again. Now, when I was changing the colors I already knew that I wanted white for when your motive bar is in the red and varying shades of pink for everything else. From earlier we know that white is 255, 255, 255. You can see this on the palette selector if you click on white. Now the game won't read those values so I have to change them to be 100 or under. If you change the number's to 100, 100, 100, you'll notice that the color is now a mid tone gray. Don't worry, this will actually appear white in game. The game lightens up whatever color you choose by a considerable amount.

Now to add the change the values in the actual package file. Go back to Notepad and change the first 3 numbers to 1, 1, 1. Like I said you'll need to take your actual RGB number in this case 100, 100, 100 and move the decimal point of each number over to the left by 2. Making the numbers you enter 1, 1, 1.

Now I knew I wanted a very pale pink for when the motive bar was orange. So I chose this color. Notice how every number is 100 or lower. Yes, the color looks very dark and desaturated but it will not appear this way in game. Like I said, the game lightens up the color. If you want to get a general idea of how your color will look in game add 100 to each of the numbers. That will be around the color you'll be getting.

Now the RGB code of this color is 100, 60, 80, so it will be converted to 1, .60, .80 . Since I want this color for when the motive bar is orange I change the second set of 3 numbers to 1, .60, .80 like so:

For yellow I want a mid range pink so I choose this color, again the numbers are 100 or lower:

Again move the decimal point over to the left by two spaces and add the numbers to the xml in this case 1, .27, .80

For green I wanted a bright Magenta so I chose this color:

Convert those numbers again and add them to the xml: 1, 0, .80

Okay now that we're done changing the values in the xml to the numbers we want them to be we click on Notepad's File>Save option.

Once you save it, exit out of notepad. s3pe will tell you that the resource has been updated and will ask you if you want to commit the change. Click Yes

Once you hit Yes, your screen should look like this

This is how it's supposed to look. The crossed out xml is the unedited version and the highlighted one is the new version. Save your package and exit out of s3pe.
Congratulations! You've now made your very own custom plumbbob color! Now just stick it in your mods folder and test it in game. You may have to fiddle around with the RGB values multiple times to get the result you really want.
If your game is paused upon loading and the plumbbob still shows up it's original color, don't panic! Just unpause the game and the plumbbob should turn colors.
I hope this was easy to follow. Have fun, and if you do decide to share your package it would be nice if you linked back to this tutorial! :D
This looks easy!! Too easy.... >_<
ReplyDeleteThank you! I'll have to try this out later!
If you have any questions, feel free to ask :D
Delete