For
this tutorial I'll be using the Cazy Hair "Over the Light"
to show you an easy peasy straight re-texture, and the Cazy Hair
"Rochelle" to show you what to do when part of the hair's
alpha is curved. You can go ahead and pick these up at TSR for free to follow along, now that TSR isn't a paysite any more (per se). Or
you can use whichever hair you like. I suggest using the same hair
I'm using though, because it'll be easier to follow along that way.
I'll also be using an edited version of Shock&Shame's texture to
re-texture the hair. You can Download my edited texture to follow along or
you can use another texture, the choice is yours.
To
re-texture these hairs, you'll need to convert them from Sims3packs
to packages. To convert them to packages you'll need Delphy's Sims 3 Pack Multi Extractor. This tutorial will not teach you how to use that program, because Delphy's has instructions on how to use it on the DL page.
Now go ahead and open the package with s3pe. Once you've done that, you'll notice a bunch of _IMG files. If you don't notice these, make sure you have both Display Names and Tags checked at the bottom, and then click on the Tag bar up top to sort the contents of the package by their tags. Next you'll want to find the Diffuse texture. It's generally the texture that looks light gray strands of hair like in the picture.
Next, right click on the _IMG resource and choose Export >
To file. S3pe will then ask you where you want to save the file, I
generally save it in a folder with a descriptive name so I don't have
problems finding it later.
Now you'll need to open the file in photoshop. The file should start with S3 and end with _IMG.dds with a bunch of numbers in between. In order for photoshop to recognize this type of file (DDS), you'll need to download the DDS plug-in for Photoshop. You can find that here. Once you're done installing the plug-in, go ahead and open the file in photoshop. Every time you open a DDS file in Photoshop, a dialog window will appear. You'll want to make sure that you're loading the image with Default Sizes and that Load MIP maps and Load Flipped Vertically are unchecked. Otherwise you're going to get a really weird looking image.
Once you open it, your image should look like the picture. Next open the texture you would like to use to replace the original
texture. I'm using a personal edit of Shock&Shame's texture
(link above). You can DL that texture here or use one of your own.
It might be easier, though, to use the same texture that I'm using so
that it's easier to follow along.
So
we're going to want to copy Shockshame's entire texture and paste it over the
top of the Cazy texture. to do this you'll press Ctrl+A to select the
entire image and then Ctrl+C to copy the image. ( You can also use
the menu up top to select the image and make a copy as well. Just
click Select and then All from the drop-down menu, and then click
Edit and select Copy from the drop-down menu.)
Now
that you've made a copy of the texture, go back
over to Cazy's Texture. To do this simply click on the tab that has
the file name displayed on it. The tab should be located under the
Menu Bar. Once you do that, press Ctrl+V to paste it over the top of Cazy's texture as a new layer. (You can
also use Edit > Paste to accomplish the same thing)
Once
you've pasted Shock&Shame's texture over the top of the Cazy
texture, you'll notice that the Layers tab (The one that's in the
wide panel) has changed. It now has two images listed. The background
image (which is the cazy texture) and the Layer 1 image (which should
be Shock&Shame's texture)
Next,
click on the Channels tab. It's the tab that is to the right of the
Layers tab on the wide panel.
Next,
click on the Channels tab. It's the tab that is to the right of the
Layers tab on the wide panel. Once that tab is shown, you'll notice 4
different channels. Red, Green, Blue, and Alpha 1. You'll also nice
an eye icon to the right of each channel. The eye tells you that a
specific layer or channel is visible.
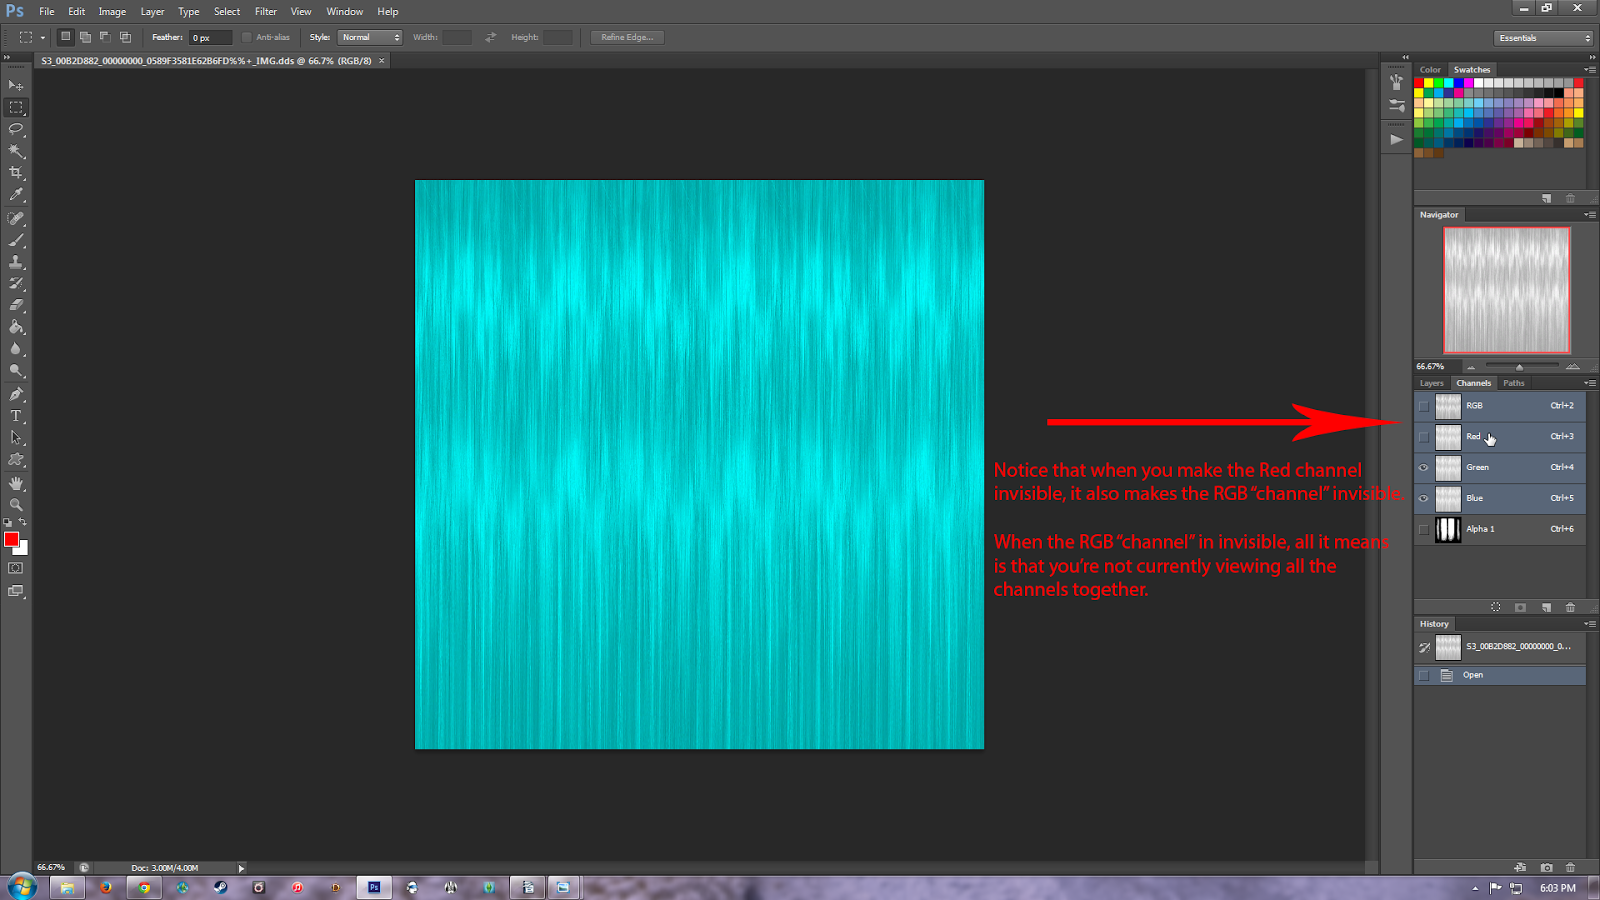
You'll
also notice what looks like another channel on the very top called
RGB. This really isn't it's own channel, it's the combination of the
Red, Green, and Blue channels. So, when RGB is "visible"
(i.e. it has the eye icon next to it), all of your channels are also
visible. You'll notice that if you try to click on the eye that is
next to the RGB channel, that you are unable to make the channel
"invisible". But if you click on the eye that is next to
the Red Channel, you can make the Red Channel invisible and the same
for all the other channels. Notice that when you make any one of the
Red, Green, and Blue channels invisible, you will also make the RGB
channel invisible. Like I said it's a combination of the three
channels, and if all the channels aren't currently visible, the RGB
"channel" won't be either.
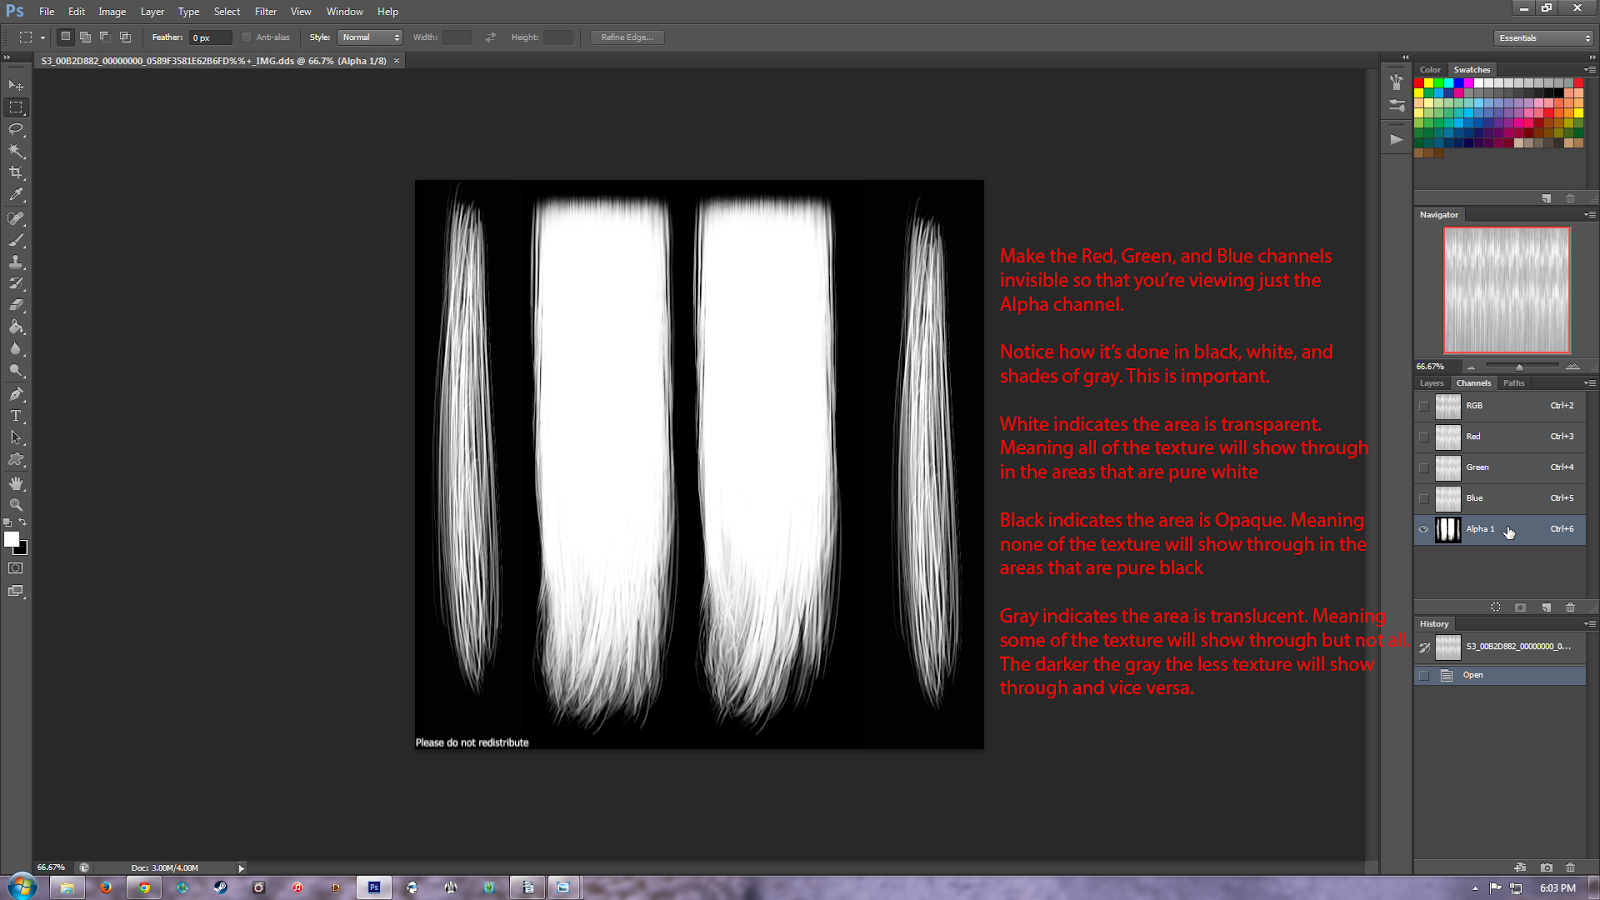
Next
we'll talk about the Alpha Channel. This channel is very important.
It tells us which part of our image is visible and which part is
transparent. In the Sims 3 in regards to Hair, the Alpha channel
tells us which part of our base texture gets applied to the hair. Now
go ahead and click on it, making sure to click anywhere but the tiny
gray box that is to the left of the word Alpha 1. This will ensure
that you're viewing just the Alpha channel and not every channel
together.
Now
look at the Alpha Channel, you'll notice that it is done in White,
Black, and Shades of Gray. White means Transparent, Black means
Opaque, and Gray means Translucent. Translucent meaning some of the
texture will show through, but not all. The darker the gray, the less
texture that will show through and vice versa.
Now
go ahead and click on RGB to make the Red, Green, and Blue Channels
visible again, doing that will make the Alpha invisible again so
you'll need to click on the tiny box next to the thumnail of your
Alpha texture. This will turn it into an eye and make it visible as
well. You are now viewing all 4 channels together and this is what it
should look like.
We
want to make the Alpha visible, because we want to see how our new
texture is going to look when applied to the Hair. It looks good
right? Now I chose this particular hair for a reason, because it's
easy. We don't have to Warp the Texture to fit the Alpha better, or
rotate it in any way, or cut and paste just pieces of our Texture or
anything like that.
Now
that you've done that go ahead and make your Alpha channel invisible
and then Flatten the Image. You'll do this by hitting Ctrl+F (if you
used my Photoshop setup) or by clicking on Layer > Flatten from
the menu up top.
Now
save the image and you're done with the Diffuse Texture. When saving
a DDS file a menu will appear with a bunch of options. You can ignore
most of these. You'll want to make sure Generate MIP maps is checked,
and then you'll need to choose an option from the drop down menu on
the top.
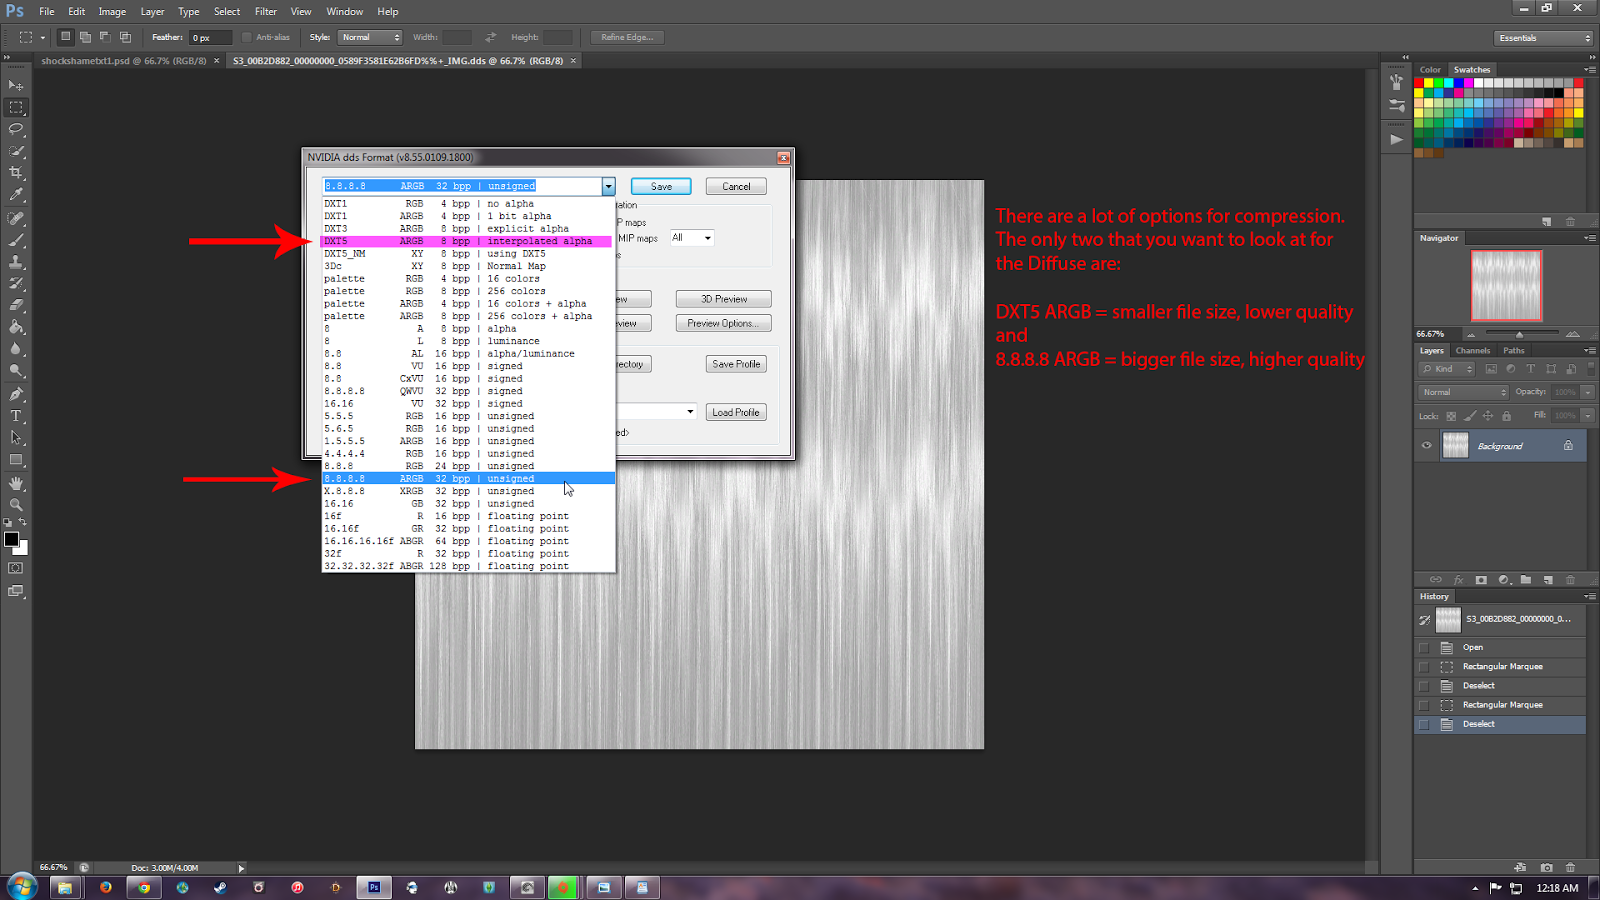
his
menu determines what compression level Photoshop will use when saving
your DDS file. The two options we'll look at for now are "DXT5
ARGB 8 bpp interpolated alpha" and "8.8.8.8 ARGB 32 Bpp
unsigned" The first will offer more compression than the second.
This means that DXT5 will be lower in quality but the file size will
be smaller. 8.8.8.8 will be higher in quality but also bigger in file
size . The choice is yours. Whichever option you choose is fine just
make sure that the option includes the text ARGB in it. We want ARGB
because that stands for AlphaRedBlueGreen, and it determines which
channels will be saved. The Diffuse texture has an Alpha Channel so
we want to make sure that gets saved along with the standard Red,
Green, and Blue Channels.
Keep the Diffuse Texture open, because we're going to be using it for the Specular and the Control.


